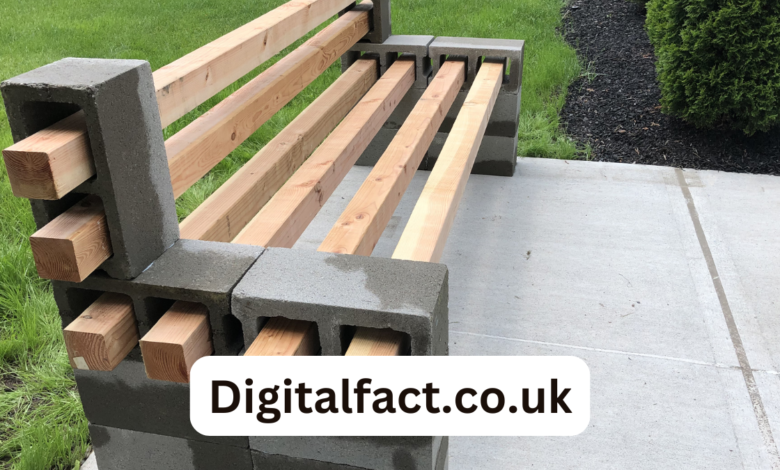
Cinder Block Bench Plans: Easy and Budget-Friendly Designs

Cinder block bench are becoming a go-to choice for DIY enthusiasts looking to create functional and stylish seating without breaking the bank. These benches are not only affordable but also highly durable and customizable, making them an excellent addition to gardens, patios, and even indoor spaces. With minimal effort and a few simple materials, anyone can build a sturdy and eye-catching bench that enhances their outdoor or indoor decor.
One of the biggest reasons why people love cinder block benches is their versatility. Whether you prefer a rustic, modern, or industrial look, you can easily adapt the design to match your aesthetic. Additionally, they require no special tools or carpentry skills, making them an ideal weekend project for beginners. If you’ve been thinking about upgrading your seating space, this guide will walk you through everything you need to know—from materials and designs to step-by-step instructions and maintenance tips.
So, are you ready to transform a few simple cinder blocks into a statement piece? Let’s dive into the world of DIY cinder block benches!
Benefits of a Cinder Block Bench
Cost-Effective and Budget-Friendly
Unlike expensive store-bought furniture, a cinder block bench costs a fraction of the price. You can source cinder blocks and wood planks from home improvement stores at an affordable rate. Additionally, if you have leftover materials from previous projects, you might even build your bench at zero cost. The affordability of this DIY project makes it a fantastic choice for homeowners, renters, and outdoor space designers.
Easy to Build – No Carpentry Skills Required
Not everyone has the tools or expertise to craft furniture from scratch, but with cinder blocks, building a bench is as easy as stacking blocks and placing wooden planks. Unlike traditional woodworking, where cutting, nailing, and drilling are required, a cinder block bench can be assembled with minimal effort and adjusted as needed.
Durable and Weather-Resistant
Cinder blocks are known for their strength and durability. They can withstand extreme weather conditions, making them perfect for outdoor use. Unlike wooden benches that may rot over time, a cinder block bench maintains its structure, resisting rain, heat, and even pests. When sealed or painted, they become even more resistant to wear and tear, ensuring they last for years.
Highly Customizable
Another fantastic benefit of cinder block benches is their adaptability. You can choose different arrangements, paint them in vibrant colors, or add cushions and upholstery for a comfortable and stylish touch. Whether you want a minimalist concrete look or a cozy, rustic vibe, the possibilities are endless.
Materials and Tools Needed
Essential Materials
- Cinder blocks (at least 6–10, depending on your design).
- Wooden planks (treated or stained for durability).
- Strong adhesive (optional, for added stability).
- Sandpaper for smoothing wooden edges.
Optional Add-ons
- Outdoor cushions or seat covers.
- Paint or waterproof sealant for protection and style.
- Decorative elements like plants or built-in storage.
Tools Required
- Measuring tape to ensure precise dimensions.
- Safety gloves and goggles for protection.
- Paintbrush or roller if decorating the cinder blocks.
Step-by-Step Guide to Building a Cinder Block Bench
Step 1: Choosing the Right Spot
Before building your bench, decide where you want to place it. Consider factors like sunlight exposure, stability of the ground, and how it will complement the rest of your outdoor or indoor decor. A flat, stable surface is ideal for preventing wobbling or shifting over time.
Step 2: Arranging the Cinder Blocks
Stack the cinder blocks in your desired layout. A common approach is to place two blocks vertically on each side with an additional layer for height. If you’re creating a longer bench, place extra blocks for added support. Make sure they are evenly spaced and aligned to prevent tipping.
Step 3: Securing the Structure
While some people leave their benches free-standing, using strong adhesive or construction glue can add extra stability, especially if the bench will be used frequently. If you plan to move the bench in the future, avoid permanent bonding.
Step 4: Adding Wooden Planks
Once your cinder block foundation is secure, place the wooden planks across the openings of the blocks. Choose sturdy, weather-resistant wood for longevity. Sand and seal the wood to prevent splinters and extend its lifespan. Secure the planks in place with screws or adhesive if needed.
Step 5: Personalizing Your Bench
Paint or stain the cinder blocks to match your outdoor aesthetic. Add cushions, pillows, or throw blankets to enhance comfort. If desired, incorporate storage solutions by using the holes in the cinder blocks for small potted plants or decorative items.
Creative Cinder Block Bench Designs
- Minimalist Concrete Look: Keep it raw and industrial for a modern touch.
- Rustic Wooden Bench: Use distressed wood for a cozy, country-style aesthetic.
- Colorful Patio Bench: Paint the blocks and planks in bright colors for a fun vibe.
- Storage-Friendly Bench: Utilize cinder block holes for books, plants, or decor.
- Garden Bench with Planters: Incorporate greenery for a fresh and lively appearance.
Maintenance and Longevity Tips
- Protect Against Weather: Apply waterproof sealant to keep the bench looking new.
- Regular Cleaning: Wipe down with a damp cloth or mild soap solution.
- Check for Stability: Ensure cinder blocks and wood planks remain firmly in place.
Conclusion
A cinder block bench is an excellent DIY project that offers affordability, durability, and creative flexibility. Whether you want to create a simple backyard seat or a statement piece for your patio, this guide has provided all the essential steps to get you started. By following these instructions, you can build a stylish and comfortable bench that will last for years. So, gather your materials, let your creativity flow, and start crafting your very own cinder block bench today!


